mini gardeners

inspiring gardening projects for children


Leave a comment

A blast from the past

the ladybird book of garden flowers

When I was growing up, everybody had Ladybird books. The fairy tales were my favourites, particularly Rumplestiltskin and the Princess & the Pea, and I can still picture the distinctive illustrations all these years later.

I can’t remember whether I ever had the Ladybird Book of Garden Flowers but in a fit of nostalgia, I ordered an old copy for myself recently.

And it’s amazing how much horticultural detail is crammed into this little book; descriptions of flowering plants with their relevant plant family and the type of soil they thrive in. No gimmicky cartoon characters in sight, just dated but strangely appealing illustrations.

ladybird book of garden flowers

I love the way the book is written in a slightly formal prose as befits a book first published in 1960. I think my version must have been published around 1973, because there is a decimal price on the back cover and it refers to over 330 ladybird titles – see here for a quick guide on how to date old ladybird books.

Let me leave you with a little gem from the introduction:

I know you will enjoy growing flowers once you start, because there is no more satisfactory hobby.”


4 Comments

Off with its head! (The short life of a rhubarb flower)

rhubarb flower

Our rhubarb has flowered for the first time. We spotted the huge flower bud a week or so ago and had the sharpened secateurs at the ready. Conventional wisdom dictates that it must be decapitated immediately otherwise the plant will be weakened by the energy required for seed production and hence be less productive.

But we were curious. And the huge flower bud has been pushed skywards on one of the thickest flower stalks we’ve ever seen and a flower resembling mini red cauliflowers looks set to emerge. (The photo above was taken on a phone so it’s not as clear as it might be.)

Flowering can be a response to rhubarb undergoing some sort of stress; too cold, too hot, not enough water, starved of nutrients. Anything that potentially shortens its lifespan so it sends up a flower to reproduce. I suspect that in our case the flowering is likely to be due to the plant maturing. We inherited the rhubarb when we took on the allotment so I have no idea how old it is or even what cultivar it is.

So perhaps it’s time to think about dividing the rhubarb crowns next winter to rejuvenate them. In the meantime, the flower stalk is on the compost heap.


Leave a comment

Easter Holidays

easter holidays

It’s been a hectic couple of weeks, involving the consumption of huge amounts of chocolate. Here’s a quick round-up of the horticultural highlights.

Flower arranging. Not one of my strengths.

flower arranging tulips

But I think the tulips are colourful enough to make up for the lack of artistic arrangement.

A seed sowing extravaganza.

sowing seeds

We’re working on the spelling.

sowing spinach seeds

New plant purchases. This one is a sedum with gorgeous blue-green leaves.

sedum

Currently in a pot on the patio table so I can see it every time I walk past the window.

Preparation for our potato/tomato grafting experiment. The potato rootstock is coming along nicely:

potato plant in a pot for grafting

Although I’ve just realised I should have removed all but one shoot from the potato – a job for tomorrow.

And last but certainly not least: a gift from my daughters.

sempervivums

A collection of sempervivums from the highly recommended http://www.sempsbypost.co.uk.


Leave a comment

Have you ever …… dissected a daffodil?

issecting a daffodil flower

Pulling flowers apart is the sort of behaviour that’s usually frowned upon. But this time it’s for a good cause; learning a little bit about flower anatomy. You don’t need to sacrifice a daffodil in its prime either, one slightly past its best works just fine. And there are no tools required apart from your own hands – we managed to tear this flower apart without scissors or knives.

Start by locating the spathe – it’s a bit like a brown paper bag just under the flower:

daffodil dissection - the spathe

The spathe protects the flower bud. It splits as the petals grow and emerge, as illustrated below:

daffodil petals emerging from the spathe

Remove the spathe, then take a good look at the petals:

daffodil petals

Our daffodil had 6 petals. When you’ve removed the petals you should be left with the cup or corona:

daffodil corona

Rip the corona lengthways then peel it away from the flower stem.  A little bit of pollen may be released as you do this.

dissecting a daffodil

Then you can remove six stamens (the male part of the flower’s reproductive system). Each stamen consists of an anther which contains the pollen grains, supported by a stalk called a filament.

daffodil dissection, showing stamens

This should leave you with the female reproductive parts; collectively known as the pistil (or carpel).

daffodil pistil, showing stigma, style & ovary

The stigma receives the pollen and a pollen tube grows down the style so that the ovules (egg cells) inside the ovary can be fertilised.

It’s fairly easy to use a thumbnail to prise the ovary apart, as in the picture above.

If all that has whetted your appetite, this link has a comprehensive summary of the structure and function of flowers.

And one final note, always supervise children when dissecting daffodil flowers. Although the daffodil is a common flower, all parts of the plant can cause illness if eaten.


2 Comments

A Sunny Weekend in Pictures

delphinium seedling

Autumn sown delphinium seedlings enjoying the sun.

succulent leaf cuttings

Succulent leaf cuttings, allowed outside for the first time.

foxgloves

Foxgloves putting on good growth. Hoping for a good flower display this year.

crocus flowers

Striped crocus flowers.

chionodoxa

Chionodoxa, otherwise known as glory-of-the-snow. No snow here as temperatures topped 18C.

patterned leaves

Beautifully patterned leaves.

willow mushroom sculptures

Giant mushrooms. Hope your weekend was warm and sunny.


3 Comments

Gearing up for spring

Spring must be just around the corner because there are signs everywhere. Flowers of Euphorbia characias subs. wulfenii are poised, ready to unfurl:

Euphorbia characias subsp. wulfeniiThe perennial wallflower (Erysimum ‘Bowles’ Mauve’) has started to flower:

Erysimum 'Bowles' Mauve'In fact, it only stopped flowering in November so this is a star performer that is in flower for 10 months of the year. I planted three of these last year following my daughters’ complaints that we didn’t have enough flowers in the garden, and they’ve filled out nicely despite a fair amount of neglect. The only downside as far as I can tell is that it’s a short-lived perennial so I must investigate the best time to take cuttings.

Potatoes are chitting:

chitting first early potatoes

I only bother chitting first earlies to give them a head start; second earlies and maincrop get thrown in the soil with no preparation and it seems to work fine.

And the first sweet peas are starting to appear:

sweet pea seedlings

These were planted in mid January and were sat in a plastic greenhouse outside until the high winds forced them outside on the patio, where they’ve been ever since. We soaked the seeds in water overnight prior to planting and germination rates have been good.

We’re growing:

‘Matucana’ – one of my favourite sweet peas that has been in cultivation for hundreds of years. It has slightly smaller flowers than some of the more modern types but they have the most amazing fragrance.

‘Blue Velvet’ – chosen for its large, ruffled deep blue flowers.

‘Air Warden’ – this one has scarlet flowers and it supposed to be very prolific (although I haven’t yet grown a sweet pea that isn’t prolific).

We’ll sow some more sweet peas later this week because in March we’ll be busy sowing lots of flowers and vegetables for the allotment, school garden and pots on the patio.


3 Comments

A Garden to Banish the January Blues

I’ll be the first to admit that our garden doesn’t look its best in winter.

There’s a bit of structural form (a few trees and some raised beds) and a tiny bit of colour from the plants that still have leaves. But it’s predominantly a mass of soggy lawn and bare stems.

So yesterday we took ourselves off to a garden that has been designed to shine at this time of year; the Winter Garden in Battersea Park.

And we were rewarded with an abundance of flowers on a cold, bright January day:

Hamamelis (witch hazel) flowers in winter

Chaenomeles (japanese quince) flowers in winter

Continue reading


Leave a comment

Reasons to be Slovenly

Calendula officinalis seed head

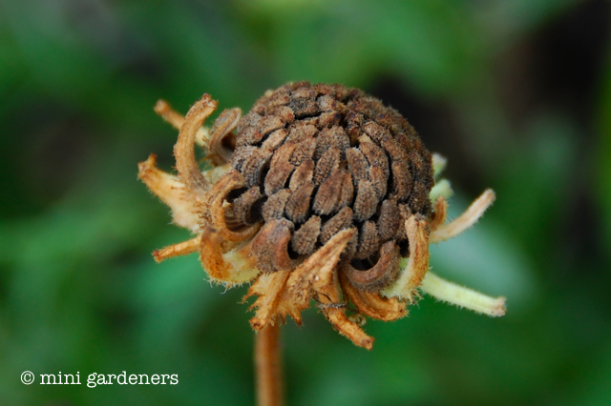
I am not, by any stretch of the imagination, a domestic goddess. The last time I saw the bottom of the ironing basket was early 1992. And the garden has an abundance of withered seed heads like the one above.

So imagine my delight to discover that being untidy in the garden is a good thing.

Oh yes. If you’re racing round the garden like a whirling dervish busily deadheading, raking and tidying (you know who you are), you’re not doing the local wildlife any favours.  Instead of a perfectly manicured garden, you should be aiming for undisturbed piles of twigs and leaves, decaying seed heads and the more nooks and crannies the better.

Another advantage of being slovenly in the garden is that you can collect your own seed, not only saving yourself a fortune but keeping lots of children entertained in the process.

Our rule of thumb is that seed heads are ready for collecting when they look their absolute worst (serial deadheaders and neat freaks will have caved in and chopped well before this point). One of our Calendula plants illustrates this well:

Calendula officinalis when to collect seed

Sunflowers are also good candidates for seed collecting with children, if you can get to the seeds before the birds. Useful if you have a large group of children, like a school gardening club, as each sunflower head has hundreds of seeds. A pair of tweezers can be handy for extracting the seeds.

sunflower seed head

The Aquilegia and Delphinium seed heads in our garden passed the looks-awful-ready-for-collecting-seed rule of thumb too. These were tricky as the slightest touch to the seed head sent sprays of seeds flying everywhere.  In the end we had to resort to putting a paper bag over the seed head before cutting from the plant in an attempt to contain the chaos.

Aquilegia seed head

Some of our seeds may not produce flowers that are identical to the parent plant. I can’t remember whether the delphiniums were F1 hybrids. If so, they definately won’t produce identical plants but for us this isn’t important.

Before storing, we separated the seeds from the chaff (the delightful technical term for all the rubbish that isn’t seed) and then left the seeds indoors to dry for a couple of days.

This was a perfect opportunity to make some more seed packets to store our seed until the spring. Full step by step instructions can be found here.

homemade seed packets

Damp and warm are the joint enemies when storing seed as this will encourage them to germinate or rot. So when the seeds are safely tucked into their packets we’ll find a cool, dry place to store them i.e. not a warm, steamy kitchen.

And the final task (sometimes the trickiest, I find) is to remember where you stored the seed packets so you can find them again next spring when it’s time to sow.


Leave a comment

A Perfumed Bank Holiday

making perfume from flower petals

It was a Bank Holiday weekend with blue skies and a fair bit of sunshine, perfect for a spot of perfume making using flower petals from the garden.

Your perfume manufacturing technique may be more sophisticated than ours; we throw some random petals in a bucket of water, bash with a large stick, leave for a week and throw away when it turns mouldy.

Next time we might try a more sophisticated approach. There are lots of instructions on the internet for making perfume using rubbing alcohol, whatever that is (I’m only familiar with the alcohol that comes in a bottle for drinking). But this Guardian article suggests a simpler improvement to our very basic technique – steeping the petals in cooling boiled water, then sieving and bottling.

Oh, and our top tip is: don’t add leaves of Helichrysum italicum (otherwise known as the curry plant) unless you particularly want to smell like an Indian restaurant.


Leave a comment

The Marge Simpson of the Garden

muscari latifolium

muscari latifolium

I first spotted this grape hyacinth at Kew Gardens last year and had to have a go at growing it.

Like most grape hyacinths, the flower resembles an upside down bunch of grapes. But the crowning glory for this one is the tufty light blue top. No surprise then that it’s been described as ‘the Marge Simpson of the garden‘.

We planted the bulbs last autumn in a small terracotta pot and left them outside over the winter. And we’ve been rewarded with a fabulous display of tufty spring flowers for the past couple of weeks.

They’re easy to grow provided they have a free-draining soil (hence the reason for planting in pots rather than directly into our heavy clay borders) and they have that quirky touch that children love.